Sunday, March 28, 2010
Monday, March 22, 2010
Sunday, March 21, 2010
Tuesday, March 16, 2010
Tuesday, March 09, 2010
Mikuni PHH40 Re-installation
 It was pretty much straightforward. Just had to put a thin layer of gasket maker on the isolator's surface prior to bolting the carburetors on the intake manifold.
 Presto! Twin Mikuni carburetors finally installed and running well! I just had to tweak the Pilot Screws and the Idle Screw for a smoother idle. Engine runs great and smooth throughout the rev range. I can't wait to test it further in long road trips.
 I also repainted the inner left engine bay where the air horns are to protect the metal from rust and backfires. Gas pedal is a bit firm though...maybe it just needs to be stretched out and used more often! Fun run!
 I also cleaned up the new Purolator in-line fuel filter I added a few months ago. It was full of dirt and gunk from the fuel tank!
 Bought it at an old auto supply shot selling new old stock parts and accessories for old school rides. This is a good quality fuel filter that can easily be cleaned and reused. Looks good too...adds to the vintage feel of the engine bay.
 It was pretty much straightforward. Just had to put a thin layer of gasket maker on the isolator's surface prior to bolting the carburetors on the intake manifold.
 Presto! Twin Mikuni carburetors finally installed and running well! I just had to tweak the Pilot Screws and the Idle Screw for a smoother idle. Engine runs great and smooth throughout the rev range. I can't wait to test it further in long road trips.
 I also repainted the inner left engine bay where the air horns are to protect the metal from rust and backfires. Gas pedal is a bit firm though...maybe it just needs to be stretched out and used more often! Fun run!
 I also cleaned up the new Purolator in-line fuel filter I added a few months ago. It was full of dirt and gunk from the fuel tank!
 Bought it at an old auto supply shot selling new old stock parts and accessories for old school rides. This is a good quality fuel filter that can easily be cleaned and reused. Looks good too...adds to the vintage feel of the engine bay.
Saturday, March 06, 2010
Friday, March 05, 2010
Cleaned Up Mikuni PHH40 Carburetors
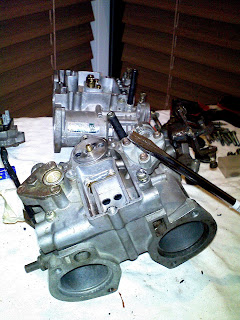
 I had a hard time using the wire brush to remove the dirt and gunk from the surface of the carburetor. I used a 3M carb cleaner, soaked the carbs for a few minutes, and brushed the dirt off...very effective, but time consuming. But it's worth it.
 I'll be buying new screws and bolts before I install the carbs to the engine. I'll try to find stainless steel ones for durability. I can't wait to attach the Mikunis and drive away!
 I had a hard time using the wire brush to remove the dirt and gunk from the surface of the carburetor. I used a 3M carb cleaner, soaked the carbs for a few minutes, and brushed the dirt off...very effective, but time consuming. But it's worth it.
 I'll be buying new screws and bolts before I install the carbs to the engine. I'll try to find stainless steel ones for durability. I can't wait to attach the Mikunis and drive away!
Wednesday, March 03, 2010
Mikuni Carburetor Cleaning
 It was such a pain removing two screws from the right side of both front and rear carburetors! I had to use a Dremel to grind new and deeper grooves. And then I had to buy the biggest screwdriver I could find that would fit those grooves. Man! What a nightmare! But at least it's all done...I finally was able to open the float chamber and check out the needle valve.
 The needle valve on the rear carb was rusty. I'm soaking it in carburetor spray solution overnight to flush out the rusted areas. The tip looks in good condition so I'll just clean it up and put it back into the valve.
 One of the problematic screws. Notice how deep I had to grind with the Dremel just to get ample grip and leverage for the screwdriver!

 It was such a pain removing two screws from the right side of both front and rear carburetors! I had to use a Dremel to grind new and deeper grooves. And then I had to buy the biggest screwdriver I could find that would fit those grooves. Man! What a nightmare! But at least it's all done...I finally was able to open the float chamber and check out the needle valve.
 The needle valve on the rear carb was rusty. I'm soaking it in carburetor spray solution overnight to flush out the rusted areas. The tip looks in good condition so I'll just clean it up and put it back into the valve.
 One of the problematic screws. Notice how deep I had to grind with the Dremel just to get ample grip and leverage for the screwdriver!


