Sunday, April 30, 2006

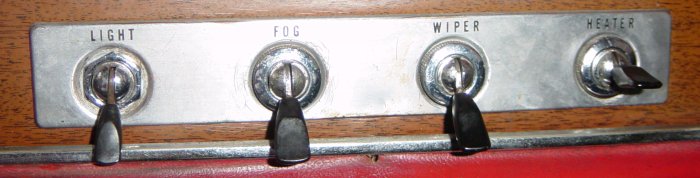
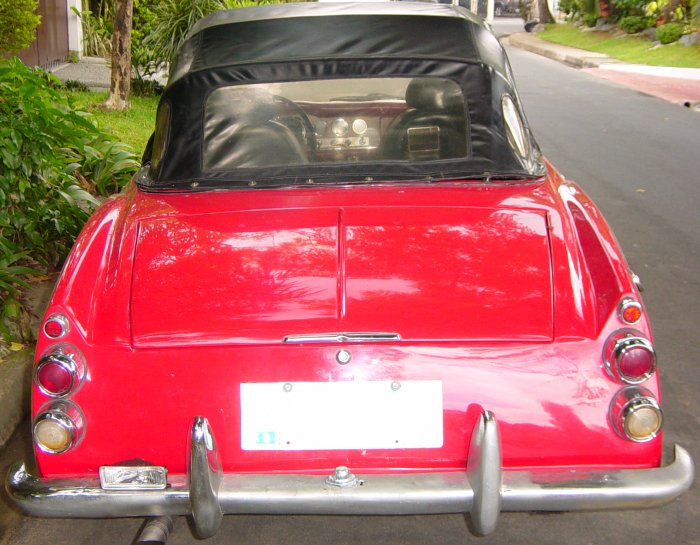
Took a shot of the rear end for documentation purposes. Both bumpers (front and rear) need to be rechromed. As you can see, the fuel cap, which should be located at the rear of the Fairlady (on the right side of the license plate), is missing. The current location is at the rear right fender well. The current location of the fuel cap is actually better since the rear end of the Fairlady becomes uncluttered. I'm not sure if the fuel cap location has been altered, but I'll definitely stick with it. The soft top is still in fairly good shape...apart from some small tears. So far the best soft top cleaner has been MC Wax. I've tried Armor All, but the finish becomes patchy...some areas are glossy and some are not. With MC Wax, the finish is even. The reverse light (left side of the rear bumper) is still not functioning. I'll need to buy a reverse switch and have it installed in the shift lever...parts are hard to find and will need to be ordered from the U.S.! Bummer! Well at least the rear brake lights and both rear signal lights are still working :)

Saturday, April 29, 2006


Some More Interior Shots

I posted some more shots of the interior just to document the restoration project:
1. Toggle switches (3-way switch) - status: all are still functional
2. Center console - status: chrome and leather are still in good condition
3. Glove box - status: push-button lock still working, applied RC1 (locally made version of WD-40...it's quite effective against rust) unto the locking mechanism to keep it from locking-up
4. Map light (rewired with a new switch) - status: still functional...surprisingly
5. Wooden shift knob (not OEM) - status: applied clear epoxy unto the underside to keep it from popping-out from the shift lever...very annoying (and quite dangerous)

Today I covered some of the holes (with aluminum tape) in the firewall to keep the heat (from the engine) from reaching the "cockpit." I hope this would lessen the heat inside the cabin, since it tends to be "sizzling" inside especially when the soft/hard top is in place. I also sprayed RC1 unto some areas of the the firewall (both sides) to keep it from rusting severly, but I'll definitely need to spray on an anti-rust coating just to be safe (I found a spray-on type at Ace Hardware...I'll definitely look into that). I also inspected some key areas of the body and applied RC1 accordingly:
1. Engine bay - beneath the brake and clutch master cylinders and alongside the steering column
2. Left and right front fenders - underneath both front fenders
3. Hood scoop - underneath at the sides of the air inlet
4. Grill - at the bottom of the grill where it's bolted unto the body
5. Driver's side and passenger side doors - at the bottom and along the hinges
6. Trunk - applied RC1 to most of the area
7. Soft top frame - hinges and support beams
8. Steering column - leading to the firewall

I'll need to have all the rusty bits cut-out from the body and to apply undercoating unto the underside of the Fairlady...and that's got to be done SOON! The problem is: I still don't have the budget! Well I guess I'll have to make do with RC1 for now (it's cheaper than WD-40 and it works just as well - Go Philippines!).

Tomorrow's plan: I'm drivin' Project T.M.! Sweet!

Sunday, April 23, 2006


Finally, I was able to replace the worn out fuel line, which almost cost me the whole roadster! Just this Monday, as I was driving around the subdivision...I smelled fuel coming out from the engine compartment. As I was checking under the bonnet, I immediately saw the culprit...a loose fuel line just below the header! Fuel was dripping...no...gushing... to the hot headers! I immediately went to the house and got the big red fire extinguisher...just in case. Luckily the fuel didn't ignite as the headers weren't hot enough (the engine had been running for around 20 minutes so it wasn't as hot as it should be if I were driving it on the highway...which I was actually planning to do if I hadn't spotted the fuel leak!). The other day I had the leak fixed and if I hadn't checked thoroughly...the roadster would have been toast! I also had the floater checked, since the fuel gauge wouldn't read full even with a full tank of gas. As it turns out, the floater also had a fuel leak. The mechanic patched the gasket up with Silicon RTV, which he says is also effective in sealing up fuel tanks. He checked the floater and it's still in good working condition. The problem lies in the fuel gauge, which I'll have to send to the electrician when I have the time...and moolah! I guess I'll have to stick with the current fuel gauge, since it does work, but won't show if the gas is full. It's better than a crapped-out gauge...since I can still check if there's fuel in the tank or if it's nearing empty.

So it really pays to check the engine bay everytime you start the car...a "pre-flight check" if you will. You'll never know what will happen with a forty-three year old car! I tested it this morning and no fuel leaks...so far. It really is a good feeling if the car performs the way you expect it to be...and at times...beyond. I really had a blast driving it down EDSA at 80+ kph...with the wind in the hair, the warm summer sun, and the open road...less the potholes of course! yeeha! :)